
If you've ever found yourself facing the disappointment of hard, unyielding rotis, you're not alone. Achieving the perfect softness can be elusive, yet the solution often lies in the details.
The key to soft, delightful rotis lies in understanding the nuances of the process, right from choosing the right ingredients to perfecting your cooking technique.
In this guide, we demystify the art of roti making, shedding light on every aspect that could potentially lead to undesirable results.
- The Importance of Flour Selection
- Perfecting the Dough Consistency
- Resting Time for Roti Dough
- Rolling Techniques for Even Heating
- Cooking Time and Temperature
- Storage Tips for Maintaining Softness
The Importance of Flour Selection
Choosing the right flour is a fundamental step in making soft, delicious roti. The type of flour you use can significantly affect the texture and pliability of your finished product. Most home cooks in roti-making regions prefer whole wheat flour, often labeled as 'atta'. This particular flour has a distinct, slightly coarse texture and is rich in fibers, lending the roti its characteristic flavor and nutritional value. Understanding the composition of flour is essential. Whole wheat flour contains a good balance of gluten proteins, which gives the dough its elastic nature. These proteins form a network when hydrated, helping the dough trap air and remain soft when cooked. This is one reason why refined flours, though smoother, lack the same pliability and result in denser, harder rotis.
Finding high-quality flour is another critical aspect. Not all commercially available flours are the same. The quality of wheat from which the flour is milled can vary greatly. Harvest conditions, wheat variety, and milling processes can all influence the final product. It's often beneficial to try different brands to find the one that consistently delivers the desired results. Some cooks even blend different types of flour to achieve the perfect balance of texture and flavor. This approach offers a chance to tailor the roti's characteristics to personal preferences or dietary needs. A quote from the respected chef Sanjeev Kapoor states, "A roti's heart is in its flour. The better the flour, the gentler the roti."
Storage also plays a role in maintaining flour quality. Freshness impacts gluten formation, and improperly stored flour can become stale, leading to disappointing results. Flour should be kept in an airtight container, away from heat and sunlight, to preserve its natural oils and minerals. These oils are essential for the subtle nutty taste of the roti and help it become soft and fluffy during cooking. Checking for rancidity before using flour is a good practice; a slight change in smell can be a giveaway. Some home cooks swear by adding a little bit of oil or ghee to the dough, which, when used appropriately, enhances the final texture of the roti. However, the foundation will always lie in the flour you choose, shaping the entire roti-making experience.
For those interested in nutritional content, especially in today's health-conscious world, examining a flour's nutrient profile can be valuable. Whole wheat flour, in particular, is known for its balance of fibers, proteins, and essential minerals. For example, a standard serving of whole wheat flour contains approximately 3.5 grams of fiber. Below is a simple representation of whole wheat flour's nutritional contents:
| Nutrient | Amount per 1/4 cup |
|---|---|
| Calories | 100 |
| Protein | 4 grams |
| Fiber | 3.5 grams |
| Iron | 4% of daily value |
These insights emphasize how integral flour selection is to roti-making. It's not merely about sifting through brands at a grocery store but involves a thoughtful consideration of quality, storage, and nutritional needs. The next time you're in the aisle trying to decide on which bag of flour to place in your cart, remember that it's a choice that goes beyond the label. Your decision can transform your everyday meal into a delightful treat, where each bite offers a burst of softness and flavor.
Perfecting the Dough Consistency
Creating the ideal dough consistency is where the magic begins in making the roti of your dreams. The texture and stretch of your dough can greatly influence the final outcome. So, how do we achieve that elusive balance that promises soft rotis every time? Start with fresh, high-quality flour. Many find that a blend of roti making flour types, such as atta and all-purpose flour, brings consistently good results, enhancing the flavor while maintaining pliability.
Water is another central player in achieving the perfect dough. Aim for a gradual incorporation rather than adding water all at once. Begin with a smaller amount, and slowly add more as needed. The dough should be soft but not sticky, smooth to the touch yet able to hold its shape. Kneading is not just a step; it's an art form. Consistent kneading allows gluten strands to develop, which leads to a more elastic dough. This elasticity is crucial in avoiding cooking mistakes that lead to a hard texture.
Consider the temperature and environment where you're preparing your dough. In warmer climates, the dough might require less resting time, whereas cooler environments might call for more patience. Aim to knead the dough for about 8 to 10 minutes if doing so by hand. A common practice among experienced cooks is to let the dough rest, covered with a damp cloth, for at least 15 to 20 minutes, allowing moisture to distribute evenly across the dough, enhancing its elasticity.
For those seeking precise methods, investing in a kitchen scale might be beneficial to maintain consistent water-to-flour ratios. An often-cited ratio is 1:2 of water to flour, but this can vary based on humidity and flour type. Speaking of flour types, did you know that flour's protein content can significantly affect your roti's outcome? "Flour quality and protein levels are fundamental to dough texture and handling," says renowned chef Sanjeev Kapoor. "Understanding your flour is key to mastering soft roti."
Some opt for adding a tablespoon of yogurt or a dash of milk to the dough for extra softness. Experimentation is encouraged until you find the balance that suits your taste preference. As you gain experience, you'll identify the subtleties that adjust to your kitchen's environment. Remember, soft roti tips often focus on technique refinement rather than drastic ingredient changes.
A final tip worth noting is to test your dough consistency by pressing your fingers gently into the surface. If it springs back slightly without leaving a deep indentation, you're on the right track. By honing your skills in this dough-making stage, you lay the foundation for delicious, melt-in-the-mouth rotis that are sure to delight with every bite.

Resting Time for Roti Dough
Understanding the significance of letting your roti dough rest after kneading can be transformative in achieving the perfect roti texture. Once you have effectively combined the flour and water, with all components harmoniously absorbing into one another, allowing the dough to sit is crucial. This resting period allows the gluten strands within the dough to relax and elongate, fostering a flexible dough that can be easily rolled out without tearing. Moreover, the resting time enables the flour particles to completely hydrate, resulting in a smoother, softer dough. The ideal resting time can vary, but many cooks recommend a minimum of 30 minutes. This might seem like an unnecessary delay, but you'll notice the difference in ease of handling and the final texture—a roti that bends easily rather than cracking.
Research has shown that gluten, the protein in wheat flour, behaves like a network of elastic bands. Allowing it to rest lets these bands unravel gently. When they relax fully, these strands create a dough that is pliant and less resistant to stretching. According to roti aficionados, even a mere 20-minute pause can make a measurable difference. Yet, if you grant up to an hour, it can result in sublime softness once the dough hits the heat. The relaxed gluten facilitates uniform cooking, as the dough evenly balloons; no part is too rigid to cook through, ensuring each portion of your roti receives equal warmth.
"Patience in dough preparation is rewarded with perfect rotis," notes culinary expert Aarti Sequeira. "A little extra time makes all the difference in texture and taste."
Not to be overlooked are the conditions under which the dough rests. Covering the bowl with a damp cloth can prevent the surface from drying out, maintaining the elasticity needed for easy rolling. Environmental factors also play a role; in more humid climates, less resting might be needed, while drier zones could require prolonged resting to achieve the moisture balance necessary for soft rotis. Paying heed to these subtle variances can aid tremendously in your quest for the perfect roti. Take notes on your environment and adapt as needed; the art of roti making is, after all, a practice in personalized technique.
To achieve this resting process, follow these simple steps:
- Knead your roti dough well until smooth and not sticky.
- Form the dough into a ball and place it in a lightly oiled bowl.
- Cover the bowl securely with a damp cloth.
- Let it sit for 30 minutes to 1 hour, depending on your climate and preference.
- Proceed to divide and roll your dough into perfect discs.
It's clear that patience and care in the earlier stages pay off with a tender, supple roti that complements your meal beautifully. By dedicating just a short phase to rest your dough, you ensure that the time spent rolling and cooking is fruitful and rewarding. Master this patiently, and you can elevate your home-cooked rotis to a new level, delighting family and friends with each soft, warm bite.
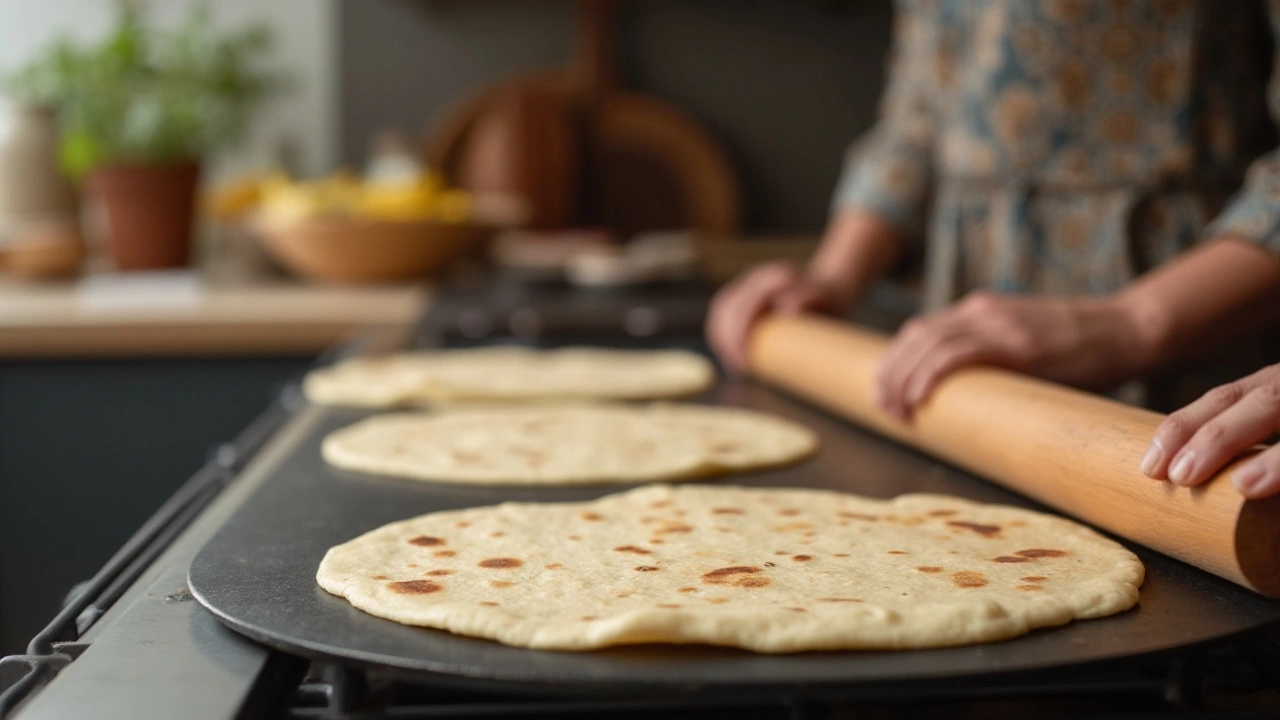
Rolling Techniques for Even Heating
Rolling a roti evenly is integral to ensuring it cooks properly, boasting a soft center and perfectly cooked edges. The rolling process, though seemingly simple, demands patience and practice to master. It's not just about applying even pressure but understanding how dough behaves under the pin. The dough you're working with should be pliable yet not sticky, which allows it to roll out smoothly without catching on your rolling surface or stick.
A balanced approach to rolling involves placing the dough ball in the center of your rolling board and working from center to edge. This technique helps achieve a uniform thickness crucial for even cooking. When rolling, if you focus only on the edges or the center, the roti will end with uneven parts. Such irregularities lead to some sections being undercooked, while others may become too crisp. Consistency in pressure aids in achieving the seamless thinness that a perfect roti necessitates.
“An even roll ensures an even cook,” says renown chef Fateh Ali from Desi Kitchens.Additionally, keep in mind the importance of size consistency, bringing each roti to about six inches in diameter is often recommended for home chefs. Sticking to this guideline assists in ensuring that every roti cooks in a similar timeframe and intensity. A pro tip is to rotate the board or the dough instead of stretching excessively. This helps maintain uniform thickness and circular shape without overworking the dough, which can lead to unnecessary toughness. Make sure your rolling pin is clean and slightly floured – not too much flour, as this can alter the dough's consistency – to prevent sticking and allow the pin to glide smoothly.
Common Pitfalls and How to Avoid Them
Typically, beginners tend to exert uneven pressure, resulting in uneven cooking. The most frequent mistake is focusing on just one area, either the edges or the center, rather than distributing the pressure. One trick is to visualize the dough as a clock, and gently roll from the center to either the edge at ‘12’, ‘3’, ‘6’, or ‘9’ as you turn the dough, ensuring your pressure is applied evenly. With time and repeated practice, muscle memory starts to develop. Interestingly, it's often said that the perfect rhythm can lead to perfectly rolled rotis. The pace at which you roll can also influence consistency. Too fast, and you might end up with tears or misplaced strength. Too slow, and you risk inadvertently sticking or drying out the dough.
Remember that practice is as vital as precision, and with time, the act of rolling a roti can become second nature. Becoming attuned to the dough’s texture allows you to adjust pressure intuitively. The goal is achieving a light, evenly rolled dough which can then be transformed into a delicious, fluffy roti.
Cooking Time and Temperature
Perfecting the art of roti making entails a keen understanding of the delicate balance between cooking time and temperature. Mastering these variables can be the defining factor that transforms an ordinary roti into a soft, delectable culinary delight. Proper heat management is crucial because too little or too much can make all the difference, often shrinking the window to achieve that desirable texture within seconds.
Firstly, the choice of pan plays a pivotal role. A cast iron tawa or a heavy griddle provides an even distribution of heat, essential for consistent cooking. Preheating the tawa is a must; medium heat is often ideal. Yet, it's a common error to crank up the stove to high in a bid to cook quicker, which results in rotis that are either half-cooked or burnt. A moderate flame ensures the roti cooks thoroughly without becoming too hard, mimicking the slow-cooked essence of traditional methods. As the roti hits the pan, allow it to cook until the top starts showing small bubbles, which is a cue to flip. This usually takes about 30 seconds, depending on the thickness of your roti.
The renowned chef Madhur Jaffrey once said, "Roti making is akin to an art, where heat controls your brushstrokes.” This rings especially true when achieving the correct roti texture.Upon the first flip, patience is critical. Let the other side cook significantly, around 20-30 seconds, until brown spots appear. Avoid pressing it too soon, as this hampers its puffing potential. The art lies in timing the final flip just as the roti starts to rise. Ensuring your pan is not overcrowded is equally vital; cooking one at a time allows you to manage each with the care it requires.
A simple yet effective tip is to rotate the roti gently with your fingers or a spatula after each flip. This motion aids in evenly heating and allows the air to circulate beneath, encouraging a perfect puff. This step ensures a faultless roti making process that results in a lovely soft inside and a lightly crisped exterior, providing a delightfully tender bite each time.
Equally critical is the temperature at which the roti is flipped and puffed. Be bold in moderating the heat; adjusting it based on the roti's response is a mark of intuition. If the first side cooks faster than desired, it indicates excess heat, requiring immediate adjustment. Establishing this rhythm between time, temperature, and aural cues of inhaling the aroma of an on-point roti makes the process seamless.
Moreover, the immediate storage of cooked rotis significantly impacts their softness. Once cooked, place them in a cloth-lined container or a thermally insulated holder, ensuring they retain heat and moisture. Enclosing them at once avoids exposure to ambient air, which can rapidly rob them of their tenderness. Rotis have an innate knack for absorbing the love they are made with, and when treated with due attention, they never cease to express gratitude in their texture and taste.
Storage Tips for Maintaining Softness
Storing rotis correctly is crucial if you want them to remain soft and enjoyable even hours after they’re made. The first thing to consider is the material you use for storage. Fabric is an excellent choice because it allows the rotis to breathe while being protected. Traditionally, people have used clean cotton cloths to wrap their rotis, ensuring they don’t lose moisture or become hard. For a more modern approach, you can keep them in an insulated container, which helps retain their warmth and softness for an extended period.
Another important consideration is timing. As soon as the rotis are off the skillet and cooked to perfection, let them cool slightly but only for a very short time to prevent steam buildup and sogginess when stored. Place them in a dedicated airtight container that keeps air and moisture levels in check. This way, not only will the texture remain desirable, but the flavor will be preserved as well, ensuring maximum satisfaction when it's time to eat.
Layering Techniques
Layering is also something to think about. It involves placing a small kitchen towel or pieces of absorbent paper between each roti as you stack them inside the storage container. This trick prevents the rotis from sticking together while absorbing excess steam that may cause them to get soggy. It is especially helpful when you have a large number of rotis and want to keep them warm and ready for serving over the course of a meal.Reheating Methods
When it comes to reheating, consider using a skillet or a hot plate rather than a microwave. The direct heat source helps to revive the lovely texture that you worked hard to achieve. While microwaves offer convenience and speed, they often make roti dry and chewy. Instead, a skillet allows you to gently bring back the warmth without compromising its original qualities.A famous culinary expert once said, "Treat your roti with care, and it will return the favor on your plate.” This wisdom, passed down through generations, is a reminder that every little effort counts when it comes to food.If you find yourself making rotis often, investing in a good quality tortilla warmer might be worthwhile. These gadgets are not only inventive but also highly effective, keeping the heat intact and the rotis from drying out. Wrap the rotis in cloth first, then place them inside the warmer. This keeps them soft and fluffy, imbuing the meal with the sense of delight you expect from the first bite.
- Poplular Tags
- roti making
- soft roti tips
- cooking mistakes
- roti texture